|
» |
|
|
|
This section describes how to configure a host-managed DTC to act as an SNMP
(Simple Network Management Protocol)
agent. For PC-based DTC management, refer
to the Using HP OpenView DTC Manager manual. Configuring SNMP Authorization Filters | |
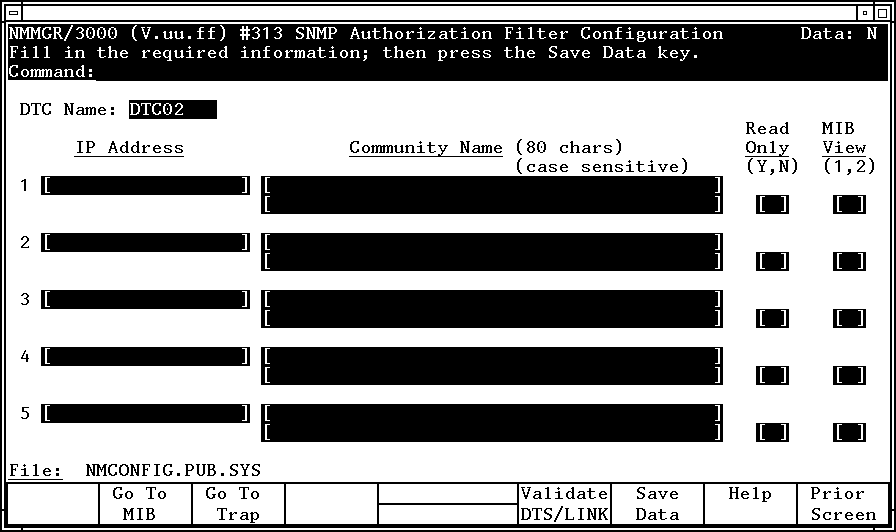
To configure SNMP authorization filters, access the SNMP Authorization
Filter Configuration screen
within
NMMGR. This screen can be accessed by pressing [F4],
the [Config SNMP] function key
at the DTC Configuration screen. See the beginning of this chapter
to find out how to access the [Config SNMP]
function key. (Refer to Figure 5-5 “DTC Configuration Screen”
for an example of a DTC Configuration screen for a DTC 72MX.)
The screen can also be accessed by pressing the [Go To Filter]
key at the SNMP MIB Configuration screen or the SNMP Trap Destination
Configuration screen. The SNMP Authorization Filter Configuration screen for host-based
management is shown below, in Figure 8-4 “SNMP Authorization Filter Screen”.
You can configure authorization filters for up to five SNMP managers. Figure 8-4 SNMP Authorization Filter Screen The "DTC Name"
field is a read-only field which indicates the SNMP configuration
is for that specific DTC. Enter the IP address of the SNMP manager in the "IP Address"
field. The IP address can be any valid individual IP address, or
enter *.*.*.*
or @.@.@.@ to
indicate that any IP address is allowed access. Enter the name of the SNMP community to which the
DTC belongs in the "Community Name"
field. The community name is a maximum of 80 alphanumeric characters
and is case-sensitive. The "Read Only"
field defines the access mode to MIB objects. Enter a Y
to restrict the SNMP manager to read-only access; enter an N
if MIB objects can be modified by the SNMP manager. If two or more managers are configured with the same community
name, the "Read Only"
field must be the same for each manager. The "MIB View"
field defines which SNMP parameters can be accessed by the SNMP
manager. Enter 1
for DTC MIB or 2
for MIB-II. If two or more managers are configured with the same community
name, the "MIB View"
field must be the same for each manager. After you have configured the authorization filters,
press the [Save Data] function
key. Note: Partially-configured filters are not acceptable. Press the [Go To MIB]
key to configure SNMP MIB parameters or the [Go To Trap]
key to configure trap destinations. If you have completed configuration
of MIB parameters and trap destinations, press the [Prior Screen]
key to return to the DTC Configuration screen, or press [Validate DTS/LINK]
to validate your configuration if you have completed configuration
for your DTCs.
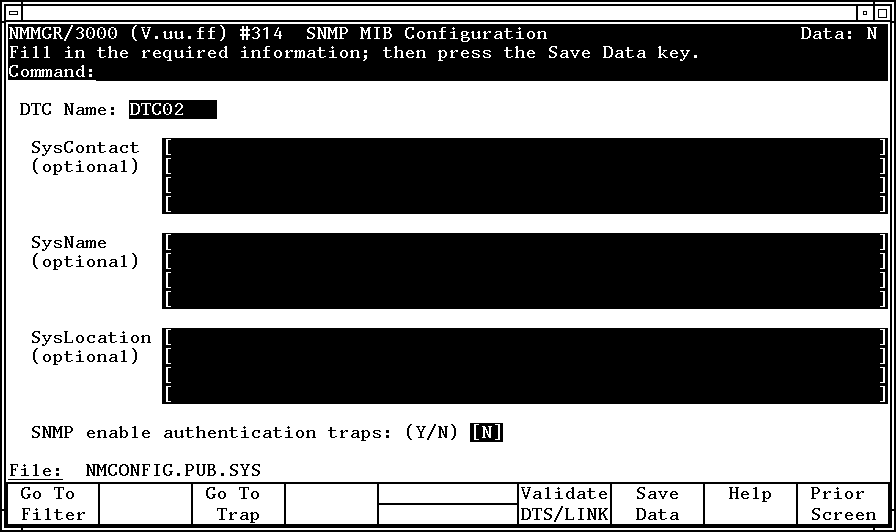
Configuring SNMP MIB Parameters | |
To configure SNMP MIB parameters and enable/disable authentication
traps, access the SNMP MIB Configuration screen.
This screen can be accessed
by pressing the [Go To MIB] key
at the SNMP Authorization Filter Configuration screen or the SNMP
Trap Destination Configuration screen. The SNMP MIB Configuration screen for host-based management
is shown below, in Figure 8-5 “SNMP MIB Configuration Screen”. Figure 8-5 SNMP MIB Configuration Screen The "DTC Name"
field is a read-only field which indicates the SNMP configuration
is for that specific DTC. The "SysContact",
"SysName", and
"SysLocation"
fields provide optional information about the DTC such as contact
person, the DTC's fully-qualified name and physical location. Each field allows text up to 256 alphanumeric characters and
is case sensitive. The "Enable authentication traps"
field indicates whether the SNMP agent should generate authentication
failure traps. Enter Y
to enable trap generation (see the section on "Configuring
Trap Destinations"); enter N
to disable it. After you have configured the MIB parameters, press
the [Save Data] function key. Press the [Go To Trap]
key to configure trap destinations or the [Go To Filter]
key to configure authorization filters. Or, if you have completed
configuration for your DTCs, press [Validate DTS/LINK]
to validate your configuration.
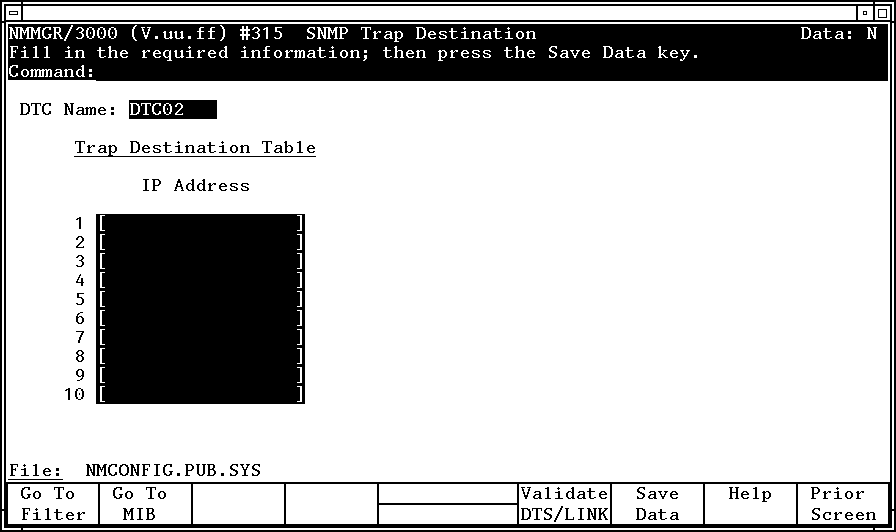
Configuring Trap Destinations | |
To specify the SNMP managers that will receive any SNMP error
messages generated by the DTC, access the SNMP Trap. Destination Configuration screen.
This screen
can be accessed by pressing the [Go To Trap] key
at the SNMP MIB Configuration screen or SNMP Authorization Filter
Configuration screen. The SNMP Trap Destination Configuration screen for host-based
management is shown in Figure 8-6 “SNMP Trap Destination Screen”.
You can configure up to ten IP addresses for trap destinations. Figure 8-6 SNMP Trap Destination Screen The "DTC Name"
field is a read-only field which indicates the SNMP configuration
is for that specific DTC. Enter the IP address of the SNMP manager in the "IP Address"
field. The IP address must be a valid individual IP address; the
global definition of IP addresses, "*.*.*.*"
or "@.@.@.@",
is not valid for this screen. Note: Only DTC MIBs can send error trap information. Make
sure that all IP addresses entered have MIB View = "1"
(see SNMP Authorization Filter Configuration screen). After you have configured the trap destinations,
press the [Save Data] function
key. Press the [Go to Filter]
key to configure authorization filters or the [Go To MIB]
key to configure MIB parameters. Or, if you have completed configuration
for your DTCs, press [Validate DTS/LINK]
to validate your configuration.
|