HP 9000 Model A-180: User's Manual > Chapter 2 A-Class
Server InstallationInstalling Internal Add-On Components |
|
This section explains how to install internal add-on components into A-Class servers. Internal add-on components include memory, cache memory, embedded disks and I/O cards. For cabinet mounted servers, it is necessary to remove the server from the cabinet to install internal add-on components. Refer to the appropriate section for internal add-on component installation information: This section describes how to install memory (RAM) into A-Class servers. Computer memory is commonly referred to as Random Access Memory (RAM). The terms RAM and memory are used interchangeably in this documentation. Abbreviated Memory SIMM installation instructions also appear on the 11" x 14" maintenance label adhered to the bottom of the top cover. A-Class memory is sold as a module. A module is defined as two SIMMs. A-Class servers support three memory module sizes: 128MB, 256MB and 512MB. The 128MB memory module consists of two 64MB SIMMS. The 256MB memory module consists of two 128MB SIMMs and the 512MB memory module consists of two 256MB SIMMs. A memory module occupies two slots. The size (or capacity) of a memory SIMM is printed along the top edge of the SIMM.
A-Class servers provide 8 slots for memory. These slots are labeled in pairs and are numbered 0a, 0b, 1a, 1b, 2a, 2b, 3a and 3b. The nomenclature for a pair of SIMM slots is 0a/b, 1a/b, 2a/b and 3a/b. The following rules govern the installation memory in A-Class Servers.
Follow the steps below to install memory in A-Class servers. The procedures in this section require opening the server and exposing the system to electrostatic discharge. Always observe all electrostatic precautions when working with components inside or out of the server. Failure to follow these precautions may result in component damage or loss of system reliability.
This section describes how to install Cache Memory SIMMs into A-Class servers. Abbreviated Cache Memory SIMM installation instructions also appear on the 11" x 14" maintenance label adhered to the bottom of the top cover. A-Class Cache Memory is sold as a module. A module is defined as two SIMMs. A-Class servers support a single 1MB Cache Memory module. The 1MB Cache Memory module consists of two 512MB SIMMs. A Cache Memory module occupies two slots. The size (or capacity) of the Cache Memory SIMM is printed along the top edge of the SIMM.
A-Class servers provide 2 slots for Cache Memory. The following rules govern the installation memory in A-Class Servers.
Follow the steps below to install Cache Memory in A-Class servers. The procedures in this section require opening the server and exposing the system to electrostatic discharge. Always observe all electrostatic precautions when working with components inside or out of the server. Failure to follow these precautions may result in component damage or loss of system reliability.
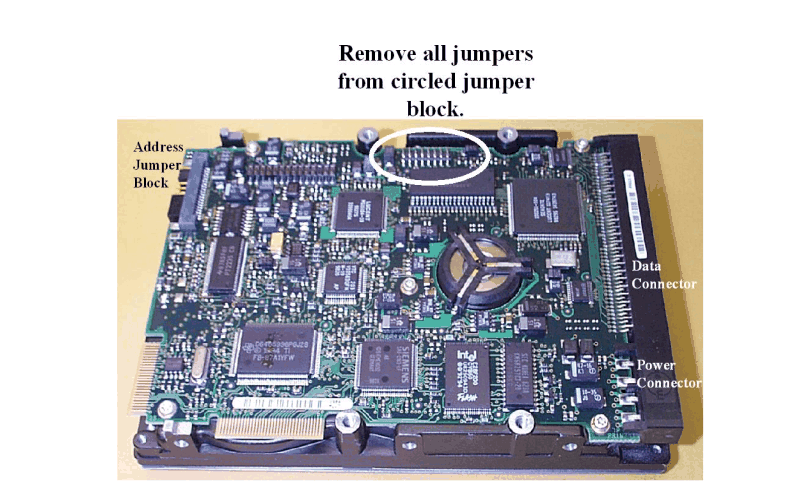
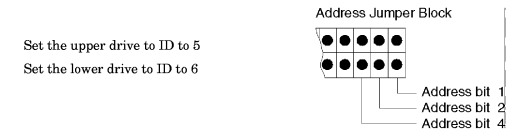
This section describes how to install embedded disk drives into A-Class servers. Abbreviated embedded disk drive installation instructions also appear on the 11" x 14" maintenance label adhered to the bottom of the top cover. A-Class servers support up to two embedded disk drives. As of April 2000, disk capacities of 4GB, 9GB and 18GB are supported. Follow the steps below to install embedded disk drives in A-Class servers. The procedures in this section require opening the server and exposing the system to electrostatic discharge. Always observe all electrostatic precautions when working with components inside or out of the server. Failure to follow these precautions may result in component damage or loss of system reliability.
This section describes how to install I/O cards into A-Class servers. Abbreviated embedded PCI I/O card installation instructions also appear on the 11" x 14" maintenance label adhered to the bottom of the top cover. A-Class servers provide two slots for I/O cards. The cards which plug into these slots can be Peripheral Component Interconnect (PCI), High Speed Connect (HSC) I/O cards or both (see photo).
The following rules govern the installation of I/O cards:
During selftest, server firmware detects the presence or absence of the A3342A HSC Remote Management card and will automatically direct server firmware output to the appropriate path (8/4/0.0 when the A3342A is present, 8/16/4.0 when the A3342A is absent). These path changes are transparent to the physical console which should be connected to the server via the connector labeled "Console 8/16/4.0". These path changes are also transparent to the server firmware 'CONSOLE PATH' value. Server firmware will not change the 'CONSOLE PATH' value. It is not necessary to manually change the 'CONSOLE PATH' value when installing or removing the A3342A. You may do so if you chose. Example: A3342A is not installed. 'CONSOLE PATH' value is 8/16/4. Server firmware directs output to 8/16/4.0. Install A3342A. The 'CONSOLE PATH' value is still 8/16/4 but server firmware directs output to 8/4/0.0. Where the console is connected never changes.
While server firmware can automatically respond to presence or absence of the A3342A HSC Remote Management card, HP-UX can not. If HP-UX was installed without a A3342A HSC Remote Management card installed, the HP-UX path for the console will be 8/16/4.0. If an A3342A HSC Remote Management card is installed, the path changes to 8/4/0.0. The driver for this path is mux2. If mux2 is not configured to be 'in', HP-UX will no longer communicate with the console. The symptom is that the server boots from the root disk, displays the following message then hangs; Trying Primary Boot Path------------------------BootingBoot IO Dependent Code (IODC) revision 144HARD Booted.ISL Revision A.00.38 OCT26, 1994ISL booting hpuxBoot:disk (8/16/5.6.0.0.0.0.0;0)/stand/vmunix3605260 + 327680 + 408736 start 0x16b2e8 To correct this condition, remove the A3342A Remote Management card, boot HP-UX, run SAM and configure the mux2 driver to be 'in'. The A3342A Remote Management card can be installed after the mux2 driver has been verified to be 'in'. Follow the steps below to install I/O cards in A-Class servers. The procedures in this section require opening the server and exposing the system to electrostatic discharge. Always observe all electrostatic precautions when working with components inside or out of the server. Failure to follow these precautions may result in component damage or loss of system reliability.
|
||||||||||||||||||||||||||||||||||||||||||||||||||||||||||||||||||||||||||||||||||||||||||||||||||||||||||||||||||||||||||||||||||||||||||||||||