|
» |
|
|
|
Choosing a good backup plan, and scheduling regular backups,
are important to the efficient operation of the system. Regularly
scheduled backups reduce the time needed to perform backups and
guarantee the most recent information is always available to users. If you are responsible for managing backups on the system,
your responsibilities include the following: Designing
a backup schedule Scheduling and performing regular backups Storing and maintaining backup media.
Backup Management | |
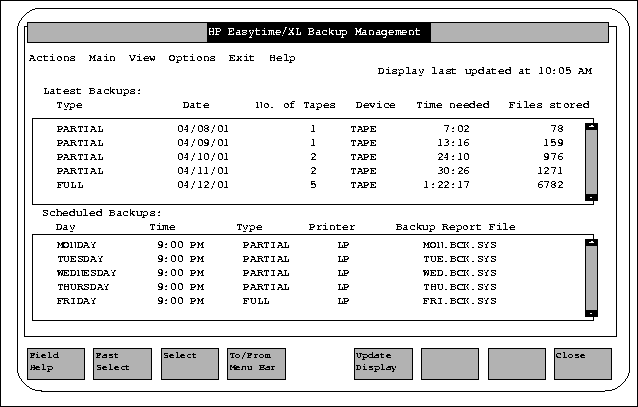
The Backup Management screen displays the current backup schedule and
provides a history of recent backups on the system including:
Type of backup (full or partial) Date the backup was performed Number of tapes required for the backup Device on which the backup was performed Time needed to complete the backup
To access Backup Management: Move the cursor to Backup Management on the Main menu. Press either F3, Return key, or the Spacebar.
The Backup Management screen in shown in Figure 3-6 “Backup Management”.
Figure 3-6 Backup Management Designing a Backup ScheduleThere are two kinds of backups that can be performed with HP Easytime/XL: A full backup copies all user files on the system whether
or not the information has changed since the last full backup. A
partial backup copies only those files that have changed since the
last full backup. Your backup schedule should include both. A typical
backup schedule allows for one full backup one day a week, and a
partial backup on each remaining work day. If such a schedule is used, no more than 24 hours worth of
information would be lost if the system should fail. Refer to Figure 3-6 “Backup Management” for a Backup Management
screen. With HP Easytime/XL, you can set up the backup schedule and
then use the Backup Management screen to review backup information.
From the Backup Management screen,
select one or more days of the week. For example, Monday through Thursday. Press F2 A to open the Actions menu. Press S for Schedule Backup. A dialog box prompts you for further scheduling information. Choose the type of backup you want (full or partial). Type the time you want the backup to start. It is best to schedule backups at the end of the workday
when users are no longer using the system. Also, schedule the backup
for the same time every day so users know when to expect it, and
can plan accordingly. Select a backup device. Select a backup printer (for backup report). To save the backup report in a file, enter a file name,
group or account were the report will be saved. Press F5 OK to schedule the backup. When the scheduled backup starts, HP Easytime/XL sets
the job and session limits to 1 to prevent any new session or jobs
from starting.
A scheduled backup will start and complete automatically only
under the following conditions: A write-enabled
tape is loaded. The tape device is configured for auto-reply. See
system configuration documentation for details. The files to be backed up must fit on one tape;
otherwise, someone must load the next one.
Canceling a Scheduled BackupA scheduled backup can be canceled at any time before it starts. From the Backup Management screen, select one or
more scheduled backups. Press F2 A to open the Actions menu. Press D for Delete Scheduled Backup. Press F5 Yes to cancel the scheduled backup.
In addition to performing regularly scheduled backups, a full
or partial backup can be performed whenever needed. Before starting
a backup, send a message warning users to log off the system, for
example: Backup will begin in 10 minutes. Please finish and log off. |
To perform the backup: Prepare backup tapes and device. Refer to the reference information received with the
drive. Load the drive. Press F2 A to open the Actions menu. Press F to Perform Full Backup. Or, press P for Perform Partial Backup. If there are active jobs and sessions a dialog box prompts
you to confirm that you want to continue. Any files currently accessed
by the active jobs and sessions will not be backed up. Press F5 Yes if you want to continue with the backup. Once the backup begins, HP Easytime/XL sets the job and session limits
to 1 to prevent any new sessions or jobs from starting. | | | |  | CAUTION: If the system is configured for auto-reply, the backup
starts immediately. Any files stored previously will be lost. | | | | |
If the system is not configured for auto-reply, a dialog box
prompts for more information. Supply the requested information and press F5 OK to continue with the backup. Or, press F7 Stop to stop the backup. During the backup process, HP Easytime/XL displays a monitoring screen
where you can check the progress of the backup. Do this by pressing F5 Update Display periodically. During the backup process, the terminal
cannot be used for anything else. If the backup is progressing correctly, the monitoring screen
displays the percent complete, for example: STORE OPERATION IS 25% COMPLETE. |
When the backup is finished, the following message is displayed: Backup finished successfully. See report ETBUPLST. |
When this message is displayed, the backup process is finished. Press F8 Close to close the monitoring screen.
Stopping the Backup ProcessPress F8 Close to close the monitoring screen and go back to
Backup Management. It can take several minutes for the backup process
to stop.
Verifying Backup InformationHP Easytime/XL prints a backup report listing every file backed
up, and every file the system was not able to back up. Check this
report to verify that all files have been successfully saved. The name of the report file is ETBUPLST. This report can be viewed on the Print File Management
screen. This file can be quite large and so the status in ON HOLD. Take the file off hold if you want to print it. Special default options can be specified when backing up the
files. If you are the system administrator, you can save these options
permanently. From the Backup Management screen,
press F2 O to open the Options menu. Press B for Set Backup Options. A dialog box prompts for more information. Type a file name, group, and account for the backup
report. If the file does not exist, HP Easytime/XL creates it. If you are the system administrator, you can press
F6 Save to save this setting permanently Or, press F5 OK to save the backup options for this session only.
Specify the backup device to be used when performing backups,
or storing and restoring files. If you are the system administrator,
you can save these options permanently.
From the Backup Management screen,
press F2 O to open the Options menu. Press D for Set Backup Device. A dialog box displays a list of available backup devices. Select a device from the list. If you are the system administrator, you can press
F6 Save to save this setting permanently. Or, press F5 OK to save the backup device for this session only.
|