HPlogo HP Easytime/XL User's Guide: HP e3000 MPE/iX Computer Systems > Chapter 3 HP Easytime/XL Tasks

Jobs

» 

Technical documentation

Complete book in PDF
» Feedback

 » Table of Contents

 » Index

Much of the work that is done on the system can be accomplished with jobs. A job is a file that contains commands that would normally be entered at the keyboard during an interactive session. When starting a job, the computer interprets and executes these commands automatically. No further user input is necessary.

HP Easytime/XL sorts jobs according to status and runs each in turn. These jobs are listed (queued) on the Job Management screen where they can be managed and can monitor their progress.

The menus at the top of the Job Management screen contain all of the options necessary for managing the jobs, including the following tasks:

  • Status

  • Starting

  • Deleting

  • Scheduling

  • Put on hold

  • Take off hold

  • Suspending and resuming jobs

  • Moving a job to top of queue

  • Changing status

  • Limiting

  • Setting Jobfence

  • Displaying

  • Sorting

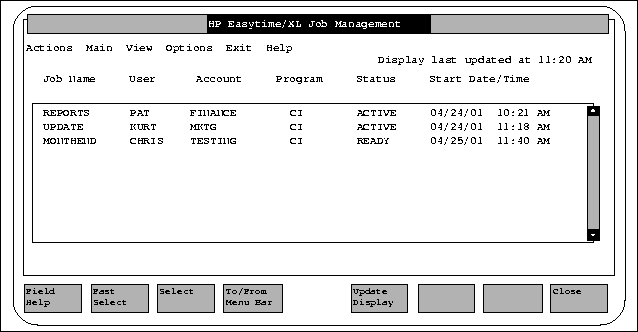
The Job Management screen provides the following information about jobs on the system:

  • Job Name

  • User name

  • Account under which the job is logged

  • Program that the job is running (if there is one)

  • Status of the job

  • Start Date/Time (when job started or when scheduled to start)

Figure 3-5 “Job Management” illustrates the Job Management screen.

Figure 3-5 Job Management

Job Management

Accessing Job Management

  1. Move the cursor to Job Management on the Main menu.

  2. Press either F3, Return key, or Spacebar.

Job Status

The jobs can be monitored on the system by checking the status field on the Job Management screen.

The status of a job can be any one of the following:

Status

Means

ACTIVE

Job is running now.

READY

The job is ready and waiting to run. The maximum number of jobs that can run at one time has been reached. This job will run when one of the active jobs is finished.

SCHEDULED

Job is scheduled to run at a later date and time. The start date and time is displayed on the Job Management screen.

ON HOLD

Job has been put on hold. A job that is on hold cannot run until it is taken off hold.

SUSPEND

The job has been interrupted (suspended) while it was running. The task Resume can be used to start it again (from the place where it was stopped).

Starting a Job

  1. Press F2 and A to open the Actions menu.

  2. Press S for Start.

    A dialog box prompts you for a job file name.

Deleting (Abort) a Job

If a job cannot continue because of an error, you may need to delete the job and restart. To delete any active job or jobs that are waiting in the job queue:

  1. Select one or more jobs from the Job Management screen.

  2. Press F2 A to open the Actions menu.

  3. Press D for Delete.

  4. Press F5 Yes to confirm deletion of jobs.

Scheduling Jobs

Jobs can be scheduled to run at a later date or time, for example, after you have gone home for the evening. If you have a job that updates a database, or other files, you can schedule it to run at night when the files are not being used.

  1. Press F2 A to open the Actions menu.

  2. Press S or Start.

  3. Enter the name of the job file in the Job File Name field.

    If the job file is in a group or account other than your logon group and account, enter them.

    If the file has a lockword, enter it.

  4. Enter start date and time for the job.

  5. Press F5 OK to schedule the job.

The job appears in the job queue with a status of SCHED and starts at the scheduled date and time.

Put On Hold

If a job in the job queue is not yet running, you can put it on hold to delay its running.

  1. Select one or more jobs with the status On Hold.

  2. Press F2 A to open the Actions menu.

  3. Press H for Put on Hold.

The job appears in the job queue with the status ON HOLD and will not start until you take it off hold.

Take Off Hold

If one of more jobs are on hold, they must be taken off hold before they can run.

  1. Select one or more jobs with the status On Hold.

  2. Press F2 A to open the Actions menu.

  3. Press O for Take off Hold.

The job appears in the job queue with a status of ACTIVE or READY.

Suspend (Interrupt) a Job

This task suspends (interrupts) a job in progress. If system resources are limited, you can speed up the processing of some jobs by suspending other, less critical jobs.

  1. Select one or more jobs with the status Active.

  2. Press F2 A to open the Actions menu

  3. Press P for Suspend.

The job stops and its status changes to SUSPEND. The job will not continue until you resume processing.

Resume a Suspended Job

  1. Select one or more jobs with the status Suspend.

  2. Press F2 A to open the Actions menu.

  3. Press R for Resume.

The job continues to run from the point where it was suspended.

Move Job to Top of Queue

If you are the system administrator, you can move a job to the top of the queue by changing the job status. It becomes the next job to run.

  1. Select one or more jobs from the Job Management screen.

  2. Press F2 A to open the Actions menu.

  3. Press N for Run Next.

Limiting the Number of Jobs

If you are the system administrator, you can limit the number of jobs running at one time on the system. If the job limit is set at 5, only the first 5 jobs can begin processing. Subsequent jobs have a status of READY and wait in the job queue until one of the active jobs ends.

  1. Press F2 A to open the Actions menu.

  2. Press L for Limit No. of Jobs.

    A dialog box prompts you to type the job limit.

  3. Type the number of jobs allowed to run concurrently.

  4. Press F5 OK to set the job limit.

Setting Jobfence

If you are the system administrator, you can restrict which jobs are allowed to execute.

The jobfence is the minimum priority level a job must exceed in order to run. The jobfence can be any value from 0 to 14. If the jobfence is set at 8, for example, then only those jobs with a priority of 9 or higher can run.

  1. Press F2 A to open the Actions menu.

  2. Press F for Set Jobfence.

    A dialog box prompts you to type the jobfence number.

  3. Type the jobfence

  4. Press F5 OK to set the jobfence.

Displaying Jobs

Log on to HP Easytime/XL and go to Job Management, to view jobs currently logged on to the system. The view can be restricted to a particular set of jobs, for example, those in a specific account.

  1. Press F2 V to open the View menu.

  2. Press V for Set View.

    A dialog box prompts you to type a set of jobs.

  3. Type the set of jobs you would like to view. Use wildcard characters to define a set of jobs.

  4. Press F5 OK to display the new view.

    Only those jobs specified are now displayed on the screen. This new view will last until exiting HP Easytime/XL, or until the view is changed again.

Resetting View

If the view of jobs has been changed, it can be reset to display all the jobs on the system.

  1. Press F2 V to open the View menu.

  2. Press R for Reset View.

Sorting Jobs

Start HP Easytime/XL and go to Job Management, jobs are sorted on the screen by status (the order in which they will run). To change the sort:

  1. Press F2 V to open the View menu.

  2. Chose one of the following Sort by settings:

    • Job Name

    • User

    • Account

    • Status

The jobs on the screen will be sorted according to the setting selected. An asterisk (*) appears in front of the selected setting. This setting is valid until exiting from HP Easytime/XL or the sort is changed again.

Feedback to webmaster