Print files are files users have requested for printing, but
have not yet printed. Because the printer can only process one file
at a time, print files need to be organized in a logical order (queued)
when sent to the printer. HP Easytime/XL sorts print files according
to their status and prints each in turn.
The menus at the top of the Print File Management screen contain
all of the tasks necessary for managing the print files, including:
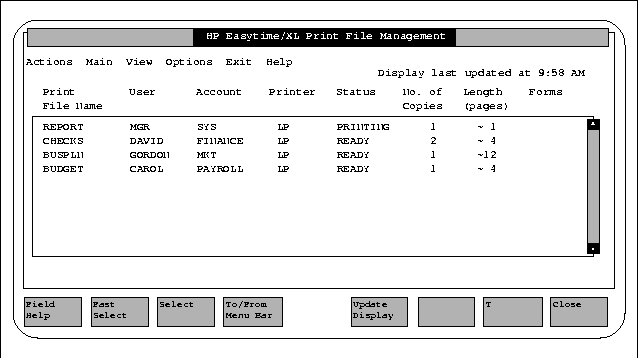
The Print File Management screen provides information about
all pending print files on the system, Including:
Monitoring Status |
 |
Monitor printing on your system by checking the status field
on the Print File Management screen.
The status of a print file can be one of the following:
- Status
Means
- CREATE
A print file is being created.
- PRINTING
Print file is printing now.
- READY
Print file is ready (waiting) to print.
- ON HOLD
Print file has been put on hold. This means that
the print file cannot print until you take it off hold.
- LOAD FORM
The print file requires a special form (kind of
paper). Because this print file is at the top of the print queue, all
printing on this printer has stopped. You must load the
form before printing can continue.
- ALIGN FORM
The print file requires that you align the form
before printing. Because this print file is at the top of the print queue,
all printing on this printer has stopped. You must align
the form before printing can continue.
- PROBLEM
There is a problem with the printer. Check to make sure
the printer is switched on, or check for a paper jam.
- UNKNOWN
This status indicates a problem with the printing program.
Contact your system administrator for assistance.
If you no longer want a print file to print, you can delete
it from the print queue.
Select one or more print files from
the Print File Management screen.
Press F2 A to open the Actions menu.
Press D for Delete.
Press F5 Yes to confirm deletion of the print file.
A print file can be put on hold to keep it from printing until
you are ready.
Select one or more print files from
the Print File Management screen.
Press F2 A to open the Actions menu.
Press H for Put on Hold.
The status of the print file changes to ON HOLD.
Once the print file is put on hold, it will not print until
it is taken off hold.
Select one or more print files with
the status ON HOLD.
Press F2 A to open the Actions menu.
Press O for Take off Hold.
The status of the print file changes to READY.
If one or more print files printed need the priority changed,
you can move them to the top of the print queue. These files are
then the next to be printed.
Select one or more print files from
the Print File Management screen.
Press F2 A to open the Actions menu.
Press N for Print Next.
Reading Contents of Print File
You can read the contents of a print file while it is waiting
in the print queue.
Select one or more print files from
the Print File Management screen.
Press F2 A to open the Actions menu.
Press R for Read.
If the first print file has a lockword, enter it.
The first 15 lines or the print file are displayed. Use the
scroll keys to browse through the contents of the print file.
If you have selected several print files to read, press F5 Read Next to display the contents of the next selected print
file.
If the next selected print file has a lockword, enter it.
Press F8 Close to close the print file when you are finished
reading.
Changing the Number of Copies
You can increase or decrease the requested number of copies
for a print file with this task.
Select one or more print files from
the Print File Management screen.
Press F2 A to open the Actions menu.
Press C for Change No. of Copies.
A dialog box prompts you for the number of copies.
Enter the number of copies you want printed.
Press F5 OK to change the number of copies.
To route your print files to another printer use this task:
Select one or more print files from
the Print File Management screen.
Press F2 A to open the Actions menu.
Press P for Change Printer.
A dialog box displays a list of available printers.
Select a printer from the list
Press F5 OK to change the printer.
Interrupt (Stop) Printing
You can stop (interrupt) a file that is printing, and start
printing again from the beginning. Use this task to recover after
a paper jam.
Select the print file that is currently
printing.
Print F2 A to open the Actions menu.
Press E for Reprint.
Some print files need to be printed on a form or special kind
of paper. When a form is needed, the status line on your screen
displays the message: LOAD FORM. You must respond to the
request before printing on this printer can continue.
Select a print file with the status
Load Form.
Press F2 A to open the Actions menu.
Press L for Load Form.
A dialog box displays information about the kind of
form required.
Load the correct form in the printer.
Or, choose Put on Hold from the dialog box. In this particular case, you
cannot use the Actions menu to put the form
on hold.
Press F5 OK when the form is loaded and you want to start
printing.
Some print files that require a form also require that you
align the form before printing. This is to ensure that all alignments
are set before running a large quantity.
When alignment of a form is needed the status line on the
screen displays the message: ALIGN FORM. You must respond to this
request before printing on this printer can continue.
Select a print file with the status Align Form.
Press F2 A to open the Actions menu.
Press F for Align Form.
A dialog box prompts you to align the form.
Align the form in the paper tray.
Or, choose Test to first print a test line to check alignment.
Press F5 OK to inform the system that the form is aligned.
Log on to HP Easytime/XL and go to Print File Management,
you will see all the print files under your logon name and account.
You may want to expand the view to include print files in another
account, or restrict it to a particular set of print files, for
example, those on a specific printer.
Press F2 V to open the View menu.
Press V for Set View.
A dialog box prompts you to enter a set of print files.
Enter the set of print files you would like to view.
Wildcard characters can be used to define a set of print files.
Select one or more printers.
Press F5 OK to display the new view.
Only those print files you specified are now displayed
on the screen. This new view will last until you exit HP Easytime/XL,
or change the view again.
If you have changed your view of print files, you can quickly
reset it to display all the print files under your logon name and
account.
Press F2 V to open the View menu.
Press R for Reset View.
Start HP Easytime/XL and go to Print File Management, print
files are sorted on the screen by printer. You can change this sorting
to print file name or by status etc.
Press
F2 V to open the View menu.
Choose one of the following Sort settings:
The print files on the screen will be sorted according to
the setting selected. An asterisk (*) appears in front of the selected
setting. This setting is valid until exiting from HP Easytime/XL,
or changing the sort again.