|
» |
|
|
|
Files store the information with which you work. Reports,
spreadsheets, letters, and application programs are all files. If
you use the MPE/iX editor to create a document, this document is
a file. You can use the File Management screen to manage the files
on your system. If you cannot perform a task with a particular file,
it may be secured. Ask the creator of the file to release it, or
see your system administrator for assistance. The menus at the top of the File Management screen contain
all of the tasks necessary for managing the files including the
following: Displaying a set of files
Accessing File Management | |
Move the cursor to File Management on the Main menu. Press either F3, Return key, or Spacebar.
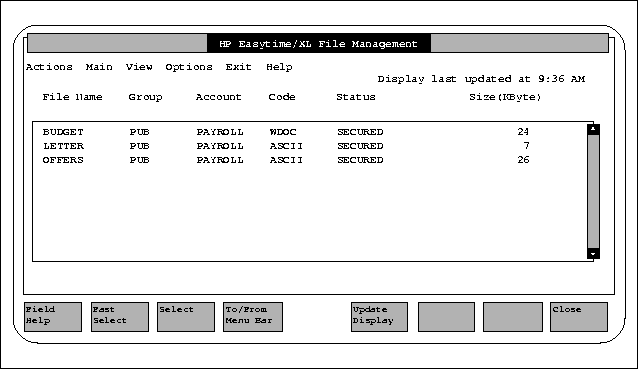
The File Management screen provides the following information
about files on the system: File Code (ASCII or application type) Status (Secured or Released)
Figure 3-2 “File Management” illustrates the File Management
screen.
Figure 3-2 File Management Printing a File | |
When you request a file to be printed, a copy of the file
(print file) is created and sent to the printer.
Select one or more files from the File
Management screen. Press F2 A to open the Actions menu. Press P for Print. A dialog box prompts you for the number of copies. Enter the number of copies you want printed. Press F5 OK to print the file. If any files have lockwords, a dialog box prompts you
to enter them. The print file is directed to the HP Easytime/XL printer.
The printer can be changed with the task Set Printer on the Options menu.
Copying Files | |
Files can be copied to the same group, or to another group
in your logon account. Files can also be copied to and from tape
for security purposes. If you want to copy a secured file, ask the
creator of the file to release it. Select one file from the File Management
screen. Press F2 A to open the Actions menu. Press C for Copy. A dialog box prompts you for a file name and group. Enter a file name, enter a new name
if copying the file to the same group. Enter a group if you want to copy the file to a
group other than your logon group. Press F5 OK to copy the file. If the file has a lockword, a dialog box prompts you
to enter it.
You cannot rename files when copying more than one at the
same time. Select files to copy. Press F2 A to open the Actions menu. Press C for Copy. A dialog box prompts you for a group. Enter a group if you want to copy the files to a
group other than your logon group. Press F5 OK to copy the files. If any files have lockwords, a dialog box prompts you
to enter them.
Storing Files | |
In addition to making regular backups, you can copy files
to storage media at any time for security purposes. Prepare storage media and device. See the reference information that you received with
your drive. Load the drive. | | | |  | CAUTION: When starting the store process, any files
currently stored on this storage media will be lost. | | | | |
Select one or more files from the File Management
screen. Press F2 A to open the Actions menu. Press S for Store. A dialog box may prompt you for more information. Supply any requested information and press F5 OK to continue. During the store process, HP Easytime/XL displays a monitoring screen
where you can check the progress of the task. Do this by pressing F5 Update Display periodically. During the store process, you cannot
use this terminal for anything else. If the store is progressing correctly, the monitoring screen
displays the percent complete, for example: STORE OPERATION IS 25% COMPLETE. When the store is finished, the following message is displayed: Store finished successfully. See report ETSTLST. Press F8 Close to close the monitoring screen.
Stopping the Store ProcessPress F7 Stop. Press F5 Yes to confirm. Press F8 Close to close the monitoring screen and go back to
File Management. It can take several minutes for the store process to
stop.
HP Easytime/XL creates a print file listing every file stored,
and every file the system was not able to store. Check this report
to verify that all files have been successfully stored on tape. The name of the report file is ETSTLST. You can view and read the contents of this file on
the Print File Management screen. This file can be quite large and
so the status is ON HOLD. Take the file off hold if you want to print it. Special store options can be set that apply when storing files.
If you are the system administrator you can save these options permanently. Press F2 O to open the Options menu. Press S for Set Store Options. A dialog box prompts you to choose store options. Enter a file name, group, and account to save the
store report in a file. If the file does not exist, HP Easytime/XL
creates it for you. Choose one of the available
options. See “HP Easytime/XL Options” if you need more information. Press F6 Save to save the store options permanently. Or, press F5 OK to save the store options for this session only.
Restoring Files | |
To restore one or more files that have been stored:
Prepare storage media and device. Refer to the reference information that was received
with the drive. Load the drive. Press F2 A to open the Actions menu. Press T for Restore. A dialog box prompts you for the names of the files
you want to restore. Enter one file name, group, and account. Or, specify a set of files using wildcard characters. Press F6 Add to List. If a file was added to the list by mistake, select
it and press F7 Delete from List. Steps 5 and 6 can be repeated to add as many files to the
list as necessary. When the files to be restored list is completed,
press F5 OK to continue. A dialog box may prompt you for more information. Supply any requested information and press F5 OK to continue. During the restore process, HP Easytime/XL displays a monitoring screen
where you can check the progress of the task. Do this by pressing F5 Update Display periodically. During the restore process, the
terminal cannot be used for anything else. When the restore is finished, the following message is displayed: Restore finished successfully. See report ETRSTLST. Press F8 Close to close the monitoring screen.
Press F7 Stop. Press F5 Yes to confirm. Press F8 Close to close the monitoring screen and go back to
File Management. It can take several minutes for the restore process
to stop.
HP Easytime/XL creates a print file listing every file restored,
and every file the system was not able to restore. Check this report
to verify that all files have been successfully restored. The name of the report file is ETRSTLST. You can view and read the contents of this file
on the Print File Management screen. This file can be quite large
and so the status is ON HOLD. The file must be taken off hold to be printed. Setting Restore Options | |
Special options can be set for restoring files. If you are
the system administrator, you can save these options permanently. Press F2 O to open the Options menu. Press R for Set Restore Options. A dialog box prompts you to choose restore options. Enter a file name, group, and account to save the
restore report in a file. If the file does not exist, HP Easytime/XL
creates it for you. You can choose one or more of the available options. See “HP Easytime/XL Options” if more information
is needed. Press F6 Save to save the restore options permanently. Or, press F5 OK to save the restore options for this session only.
Deleting Files | |
This task can be used to delete unwanted files from the system.
Renaming Files | |
You can rename any file that you created and that is in your
logon account.
Select one file from the File Management
screen. Press F2 A to open the Actions menu. Press M for Move/Rename. A dialog box prompts you for a file name and group.
Your logon group is displayed. Enter a new file name. Enter a group name if you want the renamed file
moved to a group other than your logon group. Press F5 OK to rename the file. If the file has a lockword, a dialog box prompts you
to enter it.
Moving Files | |
Files can be moved to and from other groups, but not to and
from other accounts. You can only move files that you created and
that are in your logon account. Moving a File to Another GroupSelect one file from the File Management
screen. Press F2 A to open the Actions menu. Press M for Move/Rename. A dialog box prompts you for a file name and group. Enter the file name, or if you want to give the
file a new name, enter a new file name. otherwise, enter the old
file name. Enter a group name if you want to move the file
to a group other than your logon group. Press F5 OK to move the file. If the file has a lockword, a dialog box prompts you
to enter it.
When moving more than one file to another group, you cannot
rename them at the same time.
Select files from the File Management
screen. Press F2 A to open the Actions menu. Press M for Move/Rename. A dialog box prompts you for the new group. Your logon
group is displayed. Enter a group name if you want to move the files
to a group other than your logon group. Press F5 OK to move the file. If any files have lockwords, a dialog box prompts you
to enter them.
Reading File Contents | |
You can read the contents of any file that you created. You
may also be able to read the contents of a secured file if you have
read access as provided by MPE/iX security provisions. Select one or more files from the File Management
screen. Press F2 A to open the Actions menu. Press R for Read. If the file has a lockword, a dialog box prompts you
to enter it. The first 15 lines of the file are displayed. Use the scroll
keys to browse through the contents of the file. If you have selected several files to read, press F5 Read Next to display the contents of the next selected file. If the next selected file has a lockword, a dialog box prompts
you to enter it. Press F8 Close to close the file when finished reading.
Removing MPE/iX Security Provisions | |
You can remove MPE/iX security provisions from any file that
you created. This means that users in any account can read, copy,
delete, or print the file.
Select one or more files from the File
Management screen. Press F2 A to open the Actions menu. Press L for Release. If any files have lockwords, a dialog box prompts you
to enter them.
Adding MPE/iX Security | |
If you previously removed MPE/iX security from a file, you
can reestablish security provisions with this task. You can only
secure a file if you created it.
Select one or more files from the File
Management screen. Press F2 A to open the Actions menu. Press E for Secure. If any files have lockwords, a dialog box prompts you
to enter them.
Displaying Files | |
When you log on to HP Easytime/XL and go to File Management,
you see all the files in your logon group and account. You can expand
the view to include files in another group, or restrict it to a
smaller set of files for easier management.
Press F2 V to open the View menu. Press V for Set View. A dialog box prompts you to enter a set of files. It
displays all files in the group PUB, in the account SYS. Enter the set of files you would like to view. Wildcard
characters can be used to define a set of files. Press F5 OK to display the new view. Only those files that you specified are displayed on
the screen. This new view will last until you exit HP Easytime/XL,
or change the view again.
If you have set a view of files, you can reset it to all the
files in your logon group and account. Press
F2 V to open the View menu. Press R for Reset View.
You can define how files are sorted (order in which they are
displayed) on the File Management screen. Start HP Easytime/XL and
go to the File Management screen, files are first sorted alphabetically
by account, and then by group and file name. To change this:
Press F2 V to open the View menu. Choose one of the following settings:
The files on the screen will be sorted according to the settings
selected. An asterisk (*) appears in front of the selected setting.
This setting is valid until you exit HP Easytime/XL, or until it
is changed again. |