If you select the data capture devices on the Terminal/Language
Selection Menu, the following message will appear at the bottom
of the Globals Menu:
Press NEXT to select HP 3075/6 device specifications |
Press NEXT to display the Data Capture (3075/6) Device Specifications
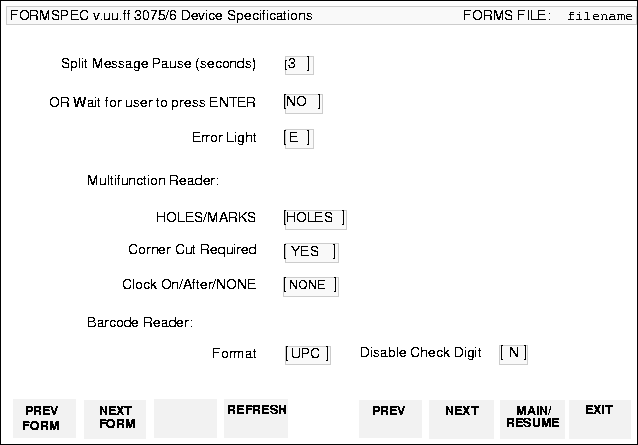
Menu, as shown in Figure 3-32 “Data Capture Device Specifications
Menu” On this menu you can
specify how you want messages longer than 24 (or 32 for the HP 3081A)
characters to be presented on single line display. In addition,
you can specify which keyboard light is to be lit if an error is
detected, and the device configuration for the Multifunction and
Bar code readers if they were specified as valid input devices.
Figure 3-32 Data Capture Device Specifications
Menu
Fields |
 |
- Split Message Pause (seconds)
You may specify the number of seconds between screen
presentations for messages longer than 24 (or 32) characters. Enter a
value between 1 and 99 in this box and a NO in the Wait for ENTER box. User and VPLUS's messages will be broken
so as not to display part of a word. This field does not apply to
Mini-CRT display.
Default 3 (seconds)
- OR Wait for user to press ENTER
You may also specify that screen presentations for
messages longer than 24 (or 32) characters be displayed after ENTER is pressed. Enter a YES in this box and a zero (0) in the Split Message Pause box. This field does not apply to Mini-CRT display.
Default NO
- Error Light
You may specify which keyboard light is to be lit
if an error is detected on the form by the application or by VPLUS.
This light will remain lit during the re-presentation of the form.
You may specify any one of the following: @, A through P.
Default E
- Multifunction Reader:
If you select the Multifunction Reader as an input
device, you can specify how it should be configured to accept valid
card and badge input. The following options are available:
- HOLES/MARKS
The card or badge will have holes or will be mark
sensed.
Default HOLES
- Corner Cut Required
The card or badge must be presented with the corner
in accordance with the diagram on the terminal.
Default YES
- Clock On/After /NONE
The card or badge will have clock marks after each
column of data, or no clock marks. Valid input is CAD (clock after
data) or NONE (no clocking).
Default NONE
Invalid combinations of the above are Holes with Clock On
data and Marks with NONE.
- Bar Code Reader
If you select the Bar Code Reader as an input device,
you can specify how it should be configured. The following options
are available:
- Format
You can specify which bar code format will be read.
Choose one of the following:
UPC — Universal Product Code
I25 — Industrial 2 out of 5
MAT — INTERMEC 2 out of 5 MATRIX code
139 — INTERMEC code 39 alphanumeric bar code
EAN — European Article Numbering
ILV — Interleaved 2 out of 5
Default UPC
code I39 is a registered trademark of Interface Mechanism,
Inc.
- Disable Check Digit
When you specify the bar code reader as an input device,
VPLUS configures the device to require check digits. You can change
this by specifying yes (Y) in this field.
Default N
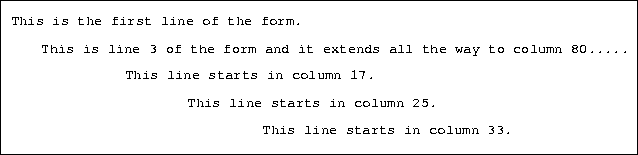
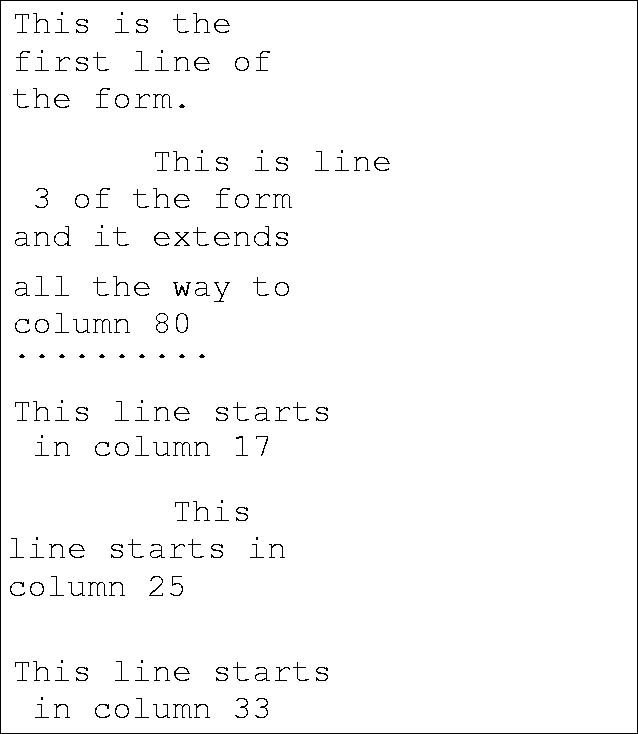
Example of how a typical form layout will took displayed on
the data capture devices:
Figure 3-33 Form Layout in FORMSPEC
Figure 3-34 Displayed on Standard Character Set Mini-CRT Screen
Figure 3-35 Displayed on 32 Character One Line Alpha Display
Screen
Figure 3-36 Displayed on Large Character Mini-CRT Screen