|
|
|
|
HP Data Entry and Forms Management System (VPLUS) Reference Manual: HP 3000 MPE/iX Computer Systems > Chapter 3 INTRODUCTION TO FORMS DESIGN GETTING STARTED WITH FORMSPEC |
|
You execute FORMSPEC in interactive mode by entering the following command in response to the MPE colon prompt:
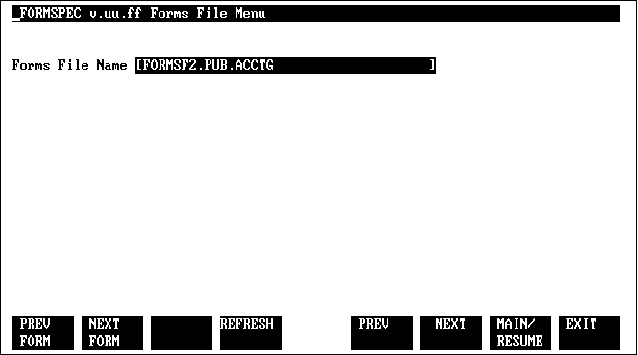
FORMSPEC runs entirely in block mode. HP block mode terminals are placed in block mode automatically by VPLUS; refer to Appendix G for a list of supported terminals. When you run FORMSPEC, it displays a series of "menus" on which you enter the specifications to define the forms for a single application. Each menu uses a fill-in-the-blanks type of format. Refer to the menu descriptions later in this section for more information on all the FORMSPEC menus. With FORMSPEC, you press ENTER to record data; you use function keys to move between FORMSPEC menus and for other tasks, as described below. You can use your terminal editing keys to correct data typed into fields on the FORMSPEC menus; refer to your terminal manual for more information. Most of the capabilities of interactive FORMSPEC are also available with batch mode FORMSPEC. (See "Using FORMSPEC in Batch Mode", Section 7 for more information.) The first menu displayed whenever you run FORMSPEC is the Forms File Menu, as shown in Figure 3-1 “Forms File Menu” The letters v.uu.ff used for Figure 3-1 “Forms File Menu”, and for all the examples shown in this manual, will be replaced by the version number of VPLUS used on your system. At the Forms File Menu, you specify the name of the forms file to be created or modified, such as the example FORMSF2.PUB.ACCTG shown in Figure 3-1 “Forms File Menu”; press ENTER. If the forms file does not exist, FORMSPEC prompts you to press ENTER again to confirm that you want to create a forms file. Once you have specified the name of the forms file and pressed ENTER, the next menu is the Main Menu, as shown in Figure 3-2 “Main Menu” Notice that the top line, called the window line, contains useful information, which includes the version number (v.uu.ff), the title of the menu (Main Menu), and the name of the forms file (FORMSF2.PUB.ACCTG). From the Main Menu, you have access to the menus of FORMSPEC with all of their forms design features. You simply type the option desired in the selection box and press ENTER. In Figure 3-2 “Main Menu” option A is specified, which selects "Add a form" and leads to a sequence of menus that allow you to design a form simply and easily. This process is described later under "Ease of Forms Design". Many of the options, including L, D, C, and X, only require information in the fields on the Main Menu in order to be executed immediately. Option B lets you create and modify and application-ready buffer for a particular form. In addition to the control provided by the Main Menu, the defined function keys, shown in the following table, allow you to select menus either for initial definition or for modification of an existing forms file. The combination of the Main Menu and function keys gives you the ability to change any form, field, or global specification as you define the forms file. Table 3-1 FORMSPEC Key Labels
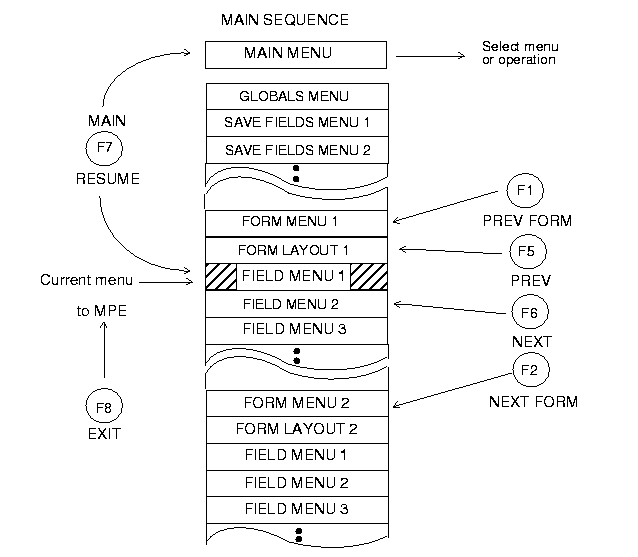
The function keys used by FORMSPEC should not be confused with the function keys defined by an application or by ENTRY for use while the application is executing, as discussed under "Advanced Forms Design" later in this section. Although the two groups of keys are physically the same programmable keys, their functions differ in most cases. FORMSPEC displays its menus in a predetermined sequence. As each menu is displayed, type in the specifications you want and then press ENTER. If you do not want to enter a specification on a particular menu, or you want to skip over one or more menus, you can use the menu sequence control function keys (NEXT FORM, PREV FORM, NEXT, and PREV). These keys allow you to select menus relative to the current menu in order to make changes or additions. Figure 3-3 “Relation between Menus and Function Keys” illustrates the relation between the menus provided by FORMSPEC and the function keys that control menu sequence. You can move forwards or backwards through the sequence of menus to locate a particular menu by pressing NEXT or PREV, respectively. If you want to skip the field menus associated with each form, you can use the PREV FORM or NEXT FORM. An alternate method is to request the Main Menu with MAIN/RESUME, and then select an existing menu. Although it is not technically a menu, the form layout associated with each form is treated as the menu following the Forms Menu when NEXT is pressed, and as the menu preceding the first Field Menu when PREV is pressed. The sequence control keys can also be used from the Main Menu. You can go to the Main Menu at any time from any other menu by pressing MAIN/RESUME. You can return to the menu from which you requested the Main Menu by pressing MAIN/RESUME. In this case, the menu on the screen when MAIN/RESUME was requested is treated as the current menu. If you just entered FORMSPEC and the Main Menu is displayed, pressing MAIN/RESUME results in a display of the Globals Menu. From the Globals Menu, NEXT FORM causes the first Form Menu to be displayed; NEXT causes a Save Field Menu to be displayed.
The purpose of the ARB is to allow you to transform screen data into application data and back again by converting data types between screen and application, and by reordering the fields. Once you have created a form and saved it in the forms file, you can create an application-ready buffer (ARB) for it if you choose. Not every form needs to have an ARB, you can create ARB's for selected forms only. You can also create an ARB for a form at any time after you have created the form itself, and you can delete an existing ARB and generate a new one if you have made extensive changes to the associated form. Fields on the form are mapped one-to-one to the ARB when you select GEN from the ARB Menu. You can rearrange fields on the form using the Screen Design Menu without affecting the ARB, and you can add and delete ARB fields without affecting the form by selecting RES (Restructure) from the ARB Menu. Before you can generate and ARB, you must define the Data Type Conversions you want to take place between the form on the screen and the ARB. From the Globals Menu, you access the Data Type Conversions menu and define the data conversion defaults. Screen and application data types are listed under "Data Type" further on in this section. Creation of an ARB is described in detail under "Using FORMSPEC to Create an ARB" in this section. At runtime, the ARB transforms the data as it appears on the screen into a format that the application can use without further manipulation, and converts application data back into a format suitable for display on the screen. VPLUS contains new functionality to address Year 2000 issues. The following sections describe features related to Year 2000 functions. FORMSPEC Application Ready Buffer (ARB) processing has been enhanced with the addition of a new ARB data type. This data type can be specified on the DTC Menu for Data Type Conversions from Screen Type to Application Type. The new ARB Type is YYYYMD and is defined as a 8-byte ASCII field containing a date value in YMD order with no separators. Also the year component in the date value has 4 digits. Note that FORMSPEC will ensure a length of 8 for the data type YYYYMD in the ARB. In essence, the value is of the form YYYYMMDD (8 bytes) even though the Type designator on the DTC Menu has been abbreviated to YYYYMD. Date processing in VPLUS has been enhanced to handle date values with 4-digit year components. Specifically, the following additions have been made. Date output will be formatted with 4-digit years if the target field is wide enough to receive the date, and the user requests this action. Examples of such output include the SET statement in FORMSPEC. The target field should be at least 10 characters in length to have a 4-digit year output. VPLUS, by default, will format date output with 2-digit years. To change the behavior as described above, define a JCW called VSETNEXTCENTURY and set bit 15 to 1 (bits are numbered from 0 through 15). It should be noted that this option will be active for fields wide enough to hold the 4-digit year date. For other fields, 2-digit years will be used. Existing 2-digit years can be interpreted differently to handle dates in the next century. Currently VPLUS handles year components 00-99 as 1900-1999. This scheme of interpretation can be changed. In the new scheme, 00-49 is interpreted as 2000-2049 and 50-99 is interpreted as 1950-1999. This interpretation will be valid through all processing done by VPLUS. For example, this scheme will allow the user to enter 02/29/00 (MDY order) in an existing application and have it processed correctly. To invoke the above method of date interpretation, define a JCW called VSETNEXTCENTURY and set bit 14 to 1. Note that this method is used for processing only 2-digit year dates and not 4-digit year dates. Note also that the display of 2-digit year dates is not affected by this enhancement. This means that 12/11/10 (MDY order) can refer to 1910 in one application and 2010 in another application.
FORMSPEC version B.06.07 has been enhanced to provide the capability to set the default Field Type and Data Type of a form. This capability can be used to reduce the time taken to complete the design of a new form. Two new fields for user input have been added to the Form Menu screen of FORMSPEC. One is for the default Field Type, and the other is for the default Data Type. On the Form Menu, the user typically specifies the name of the form and other characteristics of the form. In addition now, the user can specify the default Field Type and Data Type for the form. For a list of the allowable values for the Field Type and Data Type, refer to chapter 2 of this manual. All fields created newly for the form will have the Field Type and Data Type set to the default values supplied on the Form Menu.
This enhancement allows more than 52 single character fields to be defined for a Form. Currently the field tag which is defined for a field at screen design (creation) time should begin with an alphabetic character. This enhancement will allow several other characters to be used for the field tag, thus increasing the number of single character fields that can be defined for a Form. The following are the other characters which can be used for the field tag (defined at screen creation time):
In the case where one of the characters listed above (a Digit or a Special) is used in a single character field, the Field Name will be blanked out when the Field Menu is invoked for the field the first time. The user should input a new name for the field in this case. With this enhancement, a maximum of 80 single character fields can be defined for a Form. Forms created with previous versions of FORMSPEC can be used with this version without any modifications. Forms created with this version of FORMSPEC can be used with existing applications without any modifications. Forms created with this version of FORMSPEC can be used with previous versions of FORMSPEC. However, some extra characters may appear near the bottom of the Form Menu screen which should be ignored. These extraneous characters appear only once, the first time the Form Menu is invoked for the form, and they do not affect the functionality in any way. You can terminate operation of FORMSPEC at any time by pressing EXIT. This returns you to MPE control which then issues the MPE colon prompt (:). However, if you have made any modifications and have not compiled the forms file, FORMSPEC issues a warning. By pressing EXIT again you terminate operation of FORMSPEC without compiling the file. Refer to "Forms File" for more information on compiling the forms file. In case of unexpected interruption due to hitting BREAK or a terminal power failure, control returns to MPE. Refer to Appendix G for the steps to recovery from such a situation. Once you have recovered, the menu will be cleared to initial or previously entered values. To ensure against damage to the file, reenter the information on all menus pertaining to the form you were creating or modifying at the time of the program interruption. |
||||||||||||||||||||||||||||||||||||||||||||||||||||||||||||||||||||||||||||||||||||||||||||||||
|
|||||||||