←Part 19 Part 21→

The HP 3000--for Complete Novices
Part 20: Schemas, Continued
by George StachnikIn this issue we continue the discussion of Schemas that we began in the July/August issue. Our sample Schema and the SQL definitions are shown in Figures 1 and in Figure 2, for reference purposes.
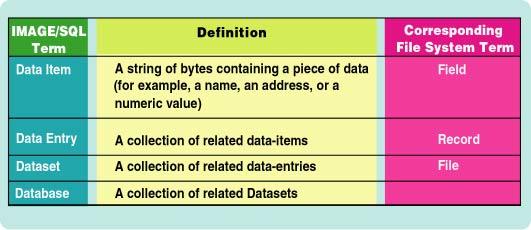
Figure 1: IMAGE/SQL Definitions
 The SETS SectionThe next part of our SCHEMA is the SETS section. It begins, predictably enough, with the word "SETS:" (don't forget the colon at the end of the word "SETS"), as shown in Figure 3. Figure 3: The SETS Section
SETS:

NAME:             CUSTOMER,MANUAL(4,8,15/8,15);

ENTRY:              ACCOUNT(1),
                    LASTNAME,
                    FIRSTNAME,
.
.
.

NAME:             DATE-MASTER,AUTOMATIC;

ENTRY:              DATE(1);

CAPACITY:         211;

.
.
.

NAME:             SALES,DETAIL(4,8,15/8,15);

ENTRY:               ACCOUNT(CUSTOMER),
                     DATE(DATE-MASTER),
                     PART-NO,
.
.
.
The word "SETS:" is followed by a description of
each of the datasets that will make up our database. In Figure 3,
we've left out a good deal of information in order to
highlight the structure of the schema. Take a moment now to locate
the lines of code shown in Figure 3 in the overall schema shown in
Figure 2.
As shown in Figure 3, each dataset description begins
with the string "NAME:" (once again, don't forget the
colon ":"). This is followed by the name of the dataset
you're describing. In Figure 3,
you can see that this particular database has three datasets
called CUSTOMER, DATE-MASTER, and SALES.
Before we delve into the SETS section any deeper, we should
review the various kinds of datasets that are found in IMAGE/SQL
databases. Remember that there are only four types of datasets
to consider: the root, Detail Datasets, Manual Master Datasets,
and Automatic Master Datasets.
The root dataset will be created automatically for you, and
it is not explicitly described in the schema. The schema must
contain a description of every detail dataset, manual master
dataset, and automatic master dataset in your database.
The SETs Section--Detail DatasetMost of the data in an IMAGE database is stored in detail datasets. In Figure 3, the word SALES is followed by the word DETAIL, which tells IMAGE/SQL that this is to be a detail dataset. The word DETAIL is followed in turn, by another READ/WRITE list. This list indicates which users will have read or write access to this data at the dataset level. We'll explore the reasoning behind having two different read/write lists (one at the item level, and one at the set level) in a future article, when we examine ways of accessing IMAGE/SQL databases. For now, let the following slight oversimplification suffice:
Search ItemsSome of the items in a detail dataset will be designated as "search items." These are items that will be used to do keyed searches of the entries in the dataset. You can easily spot the search items in a schema, because they are always followed by one of the other dataset names in parenthesis. For example, look at the ENTRY statement for the DETAIL dataset called SALES that appears in Figure 3. The first item in the SALES dataset is ACCOUNT. You can tell that ACCOUNT is a search item because it's immediately followed by the parenthesized word CUSTOMER, which is the name of one of the other datasets in this database. The name of a search item's master dataset is the word that appears in the schema in parenthesis after the search item.Using Search ItemsBecause ACCOUNT is a search item, an application program can use it to locate the data entry (or entries) in the SALES dataset having a specified value in the "ACCOUNT" item. For example, IMAGE/SQL can quickly locate the record (or records) with a specific value such as "JS-123." IMAGE/SQL will find these data entries very quickly--that is, without having to search through the entire SALES dataset to find them. This is one of the key differences between IMAGE/SQL and the old KSAM access method. Like IMAGE/SQL, KSAM allows you to find records with specific values. The difference is that CM KSAM locates the records by doing a binary search of the entire file. IMAGE/SQL uses a very efficient search algorithm that usually leads it directly to the record you're looking for. In order to be able to perform keyed access for search items, IMAGE/SQL maintains a master dataset for each search item that you define in the schema. Each master dataset will contain an index of the search items. In the case of the search item called ACCOUNT (shown in Figure 3), the corresponding master dataset is the one named CUSTOMER. Suppose our SALES dataset contains 500,000 entries (representing 500,000 orders). If every record in SALES had a unique account number, there would also be 500,000 records in the CUSTOMER dataset. But suppose that you had only 1,000 customers. This would mean that there would be, on the average, about 500 orders for each customer. The CUSTOMER set would have only 1,000 records in it, and a given account number could appear on many different records in the SALES dataset. In other words, it would mean that each customer account could have multiple orders open at the same time--which I think you'll agree would generally be a desirable situation. In that case, IMAGE/SQL would place 1,000 records (one for each unique ACCOUNT) in the CUSTOMER dataset. Look again at Figure 3, this time examining the code that defines the DATE-MASTER dataset. Like the CUSTOMER dataset, DATE-MASTER is a master dataset that contains an index of the data items in the SALES dataset. This time, however, the search item that links DATE-MASTER to SALES is the DATE data-item. IMAGE/SQL will create a record in DATE-MASTER for every unique DATE that appears in the SALES dataset. Given any date, the corresponding record in DATE-MASTER will be used as an index to quickly lead application programs to the detail dataset record (or records) that bear that date. Figure 4 shows the relationship between the three datasets defined in our schema. You'll find similar figures in many IMAGE/SQL manuals and other documentation, with master datasets represented with triangles, and details represented using 4-side figures, as shown.
Figure 4: Data Relationships
 Manual Masters and Automatic MastersThere are two kinds of master datasets: manual masters and automatic masters. An automatic master dataset is updated automatically when the corresponding detail datasets are updated. By contrast, a manual master will require a separate manual update. Looking at the schema in Figure 2, you can tell whether a master dataset is an automatic or a manual master by looking at its NAME statement in the SETS section. In Figure 3, you can see that the CUSTOMER dataset is a MANUAL master because the word MANUAL appears immediately after the dataset name. Similarly, you can see that DATE-MASTER is an AUTOMATIC master because that's what it says in the schema. The schema shown in Figure 2 contains a search item called "DATE," which is indexed by the automatic master called DATE-MASTER. We've seen that this means that for every unique value that appears in the DATE item of the detail dataset (SALES), there will be a corresponding record in the master dataset (DATE-MASTER). Suppose that we insert a new record into the SALES detail dataset, with the string "990505" in the DATE data item. In order to do this, there must be a corresponding 990505 data entry in the DATE-MASTER dataset. But, if one does not exist, IMAGE/SQL will automatically create a "990505" record in DATE-MASTER. It does this because DATE-MASTER was defined in the schema as an automatic master file. Note that in the schema, there is no read/write list associated with DATE-MASTER in the SETs section. This is because no user is allowed to update the information in an automatic master, at least not directly. IMAGE/SQL updates automatic masters for you automatically in response to corresponding changes in detail datasets. A manual master dataset works differently from an automatic master. Referring again to Figure 3, we see that ACCOUNT is an item in the SALES detail dataset, and it's indexed by the master dataset called CUSTOMER. But this time, CUSTOMER is a manual master. Suppose you want to insert a new record into the detail dataset that contains an account number of "XY-123." The master dataset associated with ACCOUNT is the one called CUSTOMER. If we had defined CUSTOMER to be an automatic master, then an XY-123 record would be automatically created for us when we added the first XY-123 record to the SALES detail dataset. But suppose that one of our clerks miskeyed the account number and entered YY-123 instead. You wouldn't want a YY-123 record to be created automatically, because there is no YY-123 account. We defined CUSTOMER to be a manual master because this forces IMAGE/SQL to check to see if there is already a record in the manual master with an ACCOUNT-Number of "YY-123." If not, then IMAGE/SQL will treat the manual master as a table of valid account numbers, and rightly reject YY-123 as an error. If the clerk corrects the error, an re-enters the transaction with an account number of XY-123, then IMAGE/SQL will once again check to see if there is an XY-123 record in the CUSTOMER dataset. And if it finds one, it will allow you to insert the new record into the SALES detail dataset, and automatically update the data entry in the CUSTOMER manual master dataset to point to it. IMAGE/SQL will not allow you to put a record into a detail dataset at all until and unless you have explicitly created corresponding records in each and every manual master that points to it.Who Gets to Create New Records In a Manual Master?Note that the CUSTOMER dataset has its own read/write list in the SETS section. In order to insert a new record into a manual master (such as CUSTOMER), your user class number must be on the WRITE list at the dataset level. Looking at the schema in Figure 2, we can see that CLERKS, SUPERs, and DO-ALLs all have read access to the data in the database, but only SUPERs and DO-ALLs are allowed to insert new records into the CUSTOMER master. Having two different kinds of masters allows IMAGE/SQL to handle two different kinds of keys. Manual Masters are appropriate when the master contains a record for every possible valid key. For example, your application may allow only a certain number of predefined valid part numbers or account numbers. If you don't want to create a new record just because some clerk miskeyed something, then you should be using manual masters, because errors will be rejected automatically. Automatic masters make sense for more free-form kinds of keys. Dates are frequently associated with automatic masters, because you don't need a table to determine whether a date is valid or not. Dates are more likely to be edited using application program logic (to eliminate dates like 13/41/9999). Each entry in a master dataset (whether it's an automatic master or a manual master) contains a pointer to the corresponding entry (or entries) in one or more detail datasets. These pointers are collectively called an index, and IMAGE/SQL is blazingly fast at indexed reads and writes of the data contained in its databases. The final data item that appears in each ENTRY section of the schema is followed by a semicolon (";"), which is an indicator that you're done defining the contents of this particular data entry. For example, look at the schema shown in Figure 2. The final ITEM in the SALES dataset is DELIV-DATE, and its definition is followed by a semicolon. Take a moment now to locate the final items in the other two datasets in the ORDERS database. Each ENTRY section of the schema is followed by the word CAPACITY: (again, note the colon) and a number, which tells how many date entries this particular dataset will hold. In a future article, we'll discuss optimal capacities for IMAGE/SQL databases in detail, because choosing the right capacity can have an impact on performance. Finally, every schema ends with the word END followed by a period.DBSCHEMA and DBUTILWhen you're done coding your schema, you're ready to create your first IMAGE/SQL database. To do this, all you have to do is run a program called DBSCHEMA. This program is in PUB.SYS and is bundled with every HP 3000. Figure 5 contains a sample listing from DBSCHEMA. Figure 5: DBSCHEMA
:file dbstext=myschema
:run dbschema.pub.sys;parm=1

PAGE 1      HEWLETT-PACKARD 30391C.07.13  TurboIMAGE/3000:

MON, MAY 17, 1999,  7:40 PM  (C) HEWLETT-PACKARD CO. 1987
.
.
.


 DATA SET      TYPE  FLD  PT  ENTR  MED  MAXIMUM     BLK  BLK  DISC
   NAME              CNT  CT  LGTH  REC  CAPACITY    FAC  LGTH SPACE

CUSTOMER          M  6    1   39    50   201         10   501  96
DATE-MASTER       A  1    1   3     14   211         36   507  32
SALES             D  8    2   26    34   1245        15   511  336

                            TOTAL DISC SECTORS INCLUDING ROOT: 480

NUMBER OF ERROR MESSAGES: 0

ITEM NAME COUNT: 13      DATA SET COUNT: 3

ROOT LENGTH: 908         BUFFER LENGTH: 511     TRAILER LENGTH: 256

ROOT FILE ORDERS CREATED.

END OF PROGRAM

:LISTFILE ORDERS,2

ACCOUNT=  STACHNIK    GROUP=  PUB

FILENAME  CODE  ------------LOGICAL RECORD-----------  ----SPACE----
                  SIZE  TYP        EOF      LIMIT R/B  SECTORS #X MX

ORDERS    PRIV     128W  FB          8         8   1        16  1  1
The program reads its input from the formal file designator
DBSTEXT. So, assuming that you've created the schema shown in
Figure 2,
and saved it in
a file called MYSCHEMA, you'd execute the following MPE commands
to run DBSCHEMA:
:FILE DBSTEXT=MYSCHEMA
:RUN DBSCHEMA.PUB.SYS;PARM=1
The string "PARM=1" tells DBSCHEMA to read its input from the DBSTEXT file equation. (Otherwise, it would try to read the schema from $STDIN, which would mean you'd have to type it online, being careful not to make any mistakes or you'd have to start over again from scratch. The PARM=1 option is, I think you'll agree, to be preferred!) DBSCHEMA will compile your schema and display any errors that it finds in an output file (by default, your terminal). Most of these errors are pretty easy to understand. For example, if you create an item in the ITEMs section but neglect to assign it to a dataset in the SETS section, DBSCHEMA will object. Similarly, it will also frown upon search items with no corresponding master file. Assuming there are no errors, DBSCHEMA will create the ROOT file for your database. Every database contains exactly one root file. It contains all the information that you've defined in the schema, but in a binary format that will be used by IMAGE/SQL as you access the database. Once the root file is created, the schema is never used again by IMAGE/SQL. In spite of this, you'll want to keep the schema around in case you ever need to rebuild the database from scratch. In the sample schema shown in Figure 2, the database was named ORDERS. Looking at the bottom of Figure 5, we see that DBSCHEMA has created a root file for us called ORDERS. We can also see that ORDERS is visible from the file system; the :LISTFILE command can be used to display its attributes. However, the PRIV filecode tells us that this is a "privileged" file. File system commands and utilities will not be able to display or modify the contents of this file. The root file will become part of the database itself; it cannot be changed or edited except by going through the IMAGE/SQL DBMS. In the last two articles in this series, you've learned the rudiments of creating a schema, and creating a root file. In the next installment, we'll complete the task of creating our database and loading it with data. We'll also begin exploring other database utilities, and learning ways of accessing data in IMAGE/SQL databases. George Stachnik works in technical training in HP's Network Server Division. |
![[3khat]](/img/3khat16.ico) 3kRanger
3kRanger