←Part 8 Part 10→

The HP 3000--
for Complete Novices
Part 9: Software Development--Editors
by George StachnikThe first eight parts of this series have focused on the administration of HP 3000 systems. Now we will turn our attention to software development. In these next few articles, we will examine the steps required to develop HP 3000 software, as well as look into some of the key software subsystems used by virtually every HP 3000 application. In these articles we presume that you have already developed software, on some other platform, or are at least familiar with the basic concepts of software development. We won't be teaching you how to write COBOL, C, Java, or any other language. We will assume that you know what a compiler is and what it's used for. We'll focus on teaching you to apply your programming skills on the HP 3000.←Part 8 Part 10→Source Code
We'll begin our study of HP 3000 software development with the creation of source code. The source code for a program is a series of statements written in some computer language. It is typed into a file, which is then fed into a compiler on the HP 3000. Loading your source code onto an HP 3000 (where the compiler can get to it) can be done in a variety of ways. In the "good old days", the usual method was to type it into a file using the MPE line editor. The line editor is a program running on the HP 3000 that allows you to enter text and store it in a file. It is worth noting that a variety of other editors have been developed for the HP 3000, and if you have access to one that you like better than the line editor feel free to use it. Otherwise, read on for instructions on using the MPE line editor.The MPE Line Editor
In the commercial computer world, most users never interact with the operating system itself. They use application programs, which in turn use the operating system. But if you're going to develop software for the HP 3000, you should know how to use at least some of MPE's basic programming tools. Sometimes, however, desktop computers and networking services simply aren't available or aren't practical, and you need to fall back on simpler tools. So it's good to know how to create a simple file and enter some ASCII text (such as program source code) into it. The MPE line editor has been justifiably criticized as being difficult to use, counterintuitive, and just plain old-fashioned. You can buy better editors for the HP 3000. (Robelle's QEDIT is one of the best, and it is available for a 90-day free trial at ( //www.robelle.com/products/qedit.html). Alternatives are available at no cost. The ubiquitous VI editor also comes standard with HP 3000 systems running MPE/iX 4.5 or later. In spite of all its shortcomings, however, most HP 3000 programmers sooner or later find it necessary to use the MPE line editor. It has the virtue of having been included with every HP 3000 system, including the 16-bit "classics". So apologies having been made, here's a short survival course in using the MPE line editor.Invoking the Editor
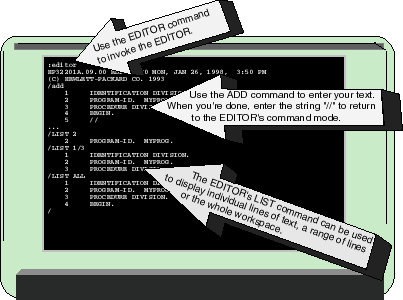
Log on to the HP 3000 employing a user and account that will give you a colon prompt. Then type the "EDITOR" command. This command automatically runs a program called EDITOR.PUB.SYS. The program displays a banner message identifying which version of the editor you are using, followed by a slash ("/") prompt. The slash prompt means that you can now enter EDITOR commands. The first one you should learn is the XPLAIN command, which tells you about all the editor commands. Typing XPLAIN ALL dumps a list of all EDITOR commands. We won't go through all of them here in detail--but we will show you some of the most frequently used EDITOR commands.Entering Text
To begin adding text to the editor's workspace, type the command "ADD". You'll be prompted with a line number. By default, the editor assumes that you want line numbers added to your text--such as 1, 2, 3, 4, etc. Type a line of text and press the RETURN key. You'll now be prompted with another line number. Type another line of text and continue in this way. When you are finished, type two slashes "//" to indicate that you're done. Figure 1 shows an example of how you might begin entering a simple COBOL program.Seeing What You've Got
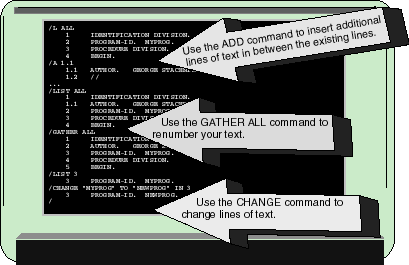
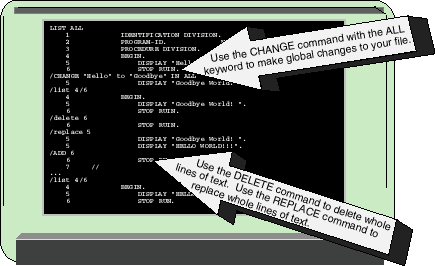
Between the time you enter the "ADD" command and the time you enter the "//" string, editor places you in "add mode". Anything you type while in add mode will be added to the file you're creating. Once you have typed the "//" string, the editor returns you to command mode. In command mode, the "/" prompt is displayed once again and you can enter EDITOR commands. One such EDITOR command is "list". The list command is used to display the contents of your editor workspace. If you simply type the word "list" all by itself, it will display only one line of text--the one on which you have most recently worked. Typically, the list command is used with parameters that describe exactly what lines of text you want to see listed. For example, "list all" means to display all the lines in the workspace. If the word "list" is followed by a line number, it means you want to display that line. And if the word "list" is followed by two line numbers separated by a slash, it displays all the lines in that range. See the examples in Figure 1.Figure 1: Entering text using the MPE editorInserting More Lines The ADD command can also have parameters. Suppose you want to add lines between line 1 and line 2. Enter the ADD command followed by two numbers--the line number you want to add and the increment by which you want to see the line numbers increase. For example, ADD 1.1,.1 tells the editor you want to add additional lines beginning with line 1.1, and going up by .1: (1.1, 1.2, 1.3...) and so on. An example is given in Figure 2. We used the "//" string to get out of ADD mode after line 1.1. If we had continued to enter text, it would have stopped automatically when the counter got to 2, because there already is a line 2. The editor will not overlay existing lines of text automatically. Notice that when we enter the "LIST ALL" command, our inserted lines appear between line 1 and line 2 just as we wanted. Suppose you want to enter more than 9 lines of text between line 1 and line 2. To do that, you need to renumber the lines. This can be done using the following command:GATHER ALLThe GATHER command can also be used to move lines of text around in your file. For example, type the following EDITOR command:GATHER 2/3 TO 4.1This moves lines 2 and 3 (and any lines between 2 and 3, if there are any) to lines 4.1, 4.2, and so on. Changing Text You can use the editor's change command to make changes to one or more lines of text. Figure 2 gives an example of how the change command might be used. The sample change command shown in the figure is telling the editor to look for the character string "MYPROG" in line 2, and if it finds it, to change it to "NEWPROG" instead. The example shows how the editor finds the string, makes the change, and displays the results.Figure 2: Adding additional textYou can use the change command to make changes to a single line of text. Or you can make global changes to lines in a range or to the entire workspace. An example is shown in Figure 3. Deleting and Replacing Lines of Text Not surprisingly, the command to delete a line of text is "DELETE". Like the other commands we've seen, DELETE can be used to delete a single line, a range of lines, or all lines in your workspace, as shown in Figure 3.Figure 3: Making global changesThe REPLACE command can be used to replace entire lines of text. It works very much like the DELETE command, except as it deletes each line of text you specify, it also prompts you for a new line to replace it. An example is shown in Figure 3.Saving Your Work
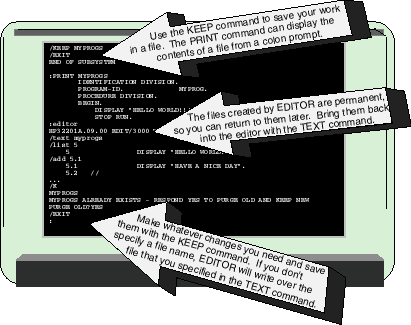
So far, all the work we've done has been stored only in the editor's workspace. If you're typing in program source, you'll want to keep your work in a permanent file, where it can be saved for later use. Editor does this using the KEEP command. To do this, type the KEEP command followed by a filename. In the example shown in Figure 4, we've used the KEEP command to save our work in a file called MYPROGS. Note that there was no file called MYPROGS when we typed this command, so editor created one for us. If a file had already existed with that name, editor would have warned us about it to save us from possibly writing over another program.Figure 4: Saving your workTo verify that MYPROGS really exists, use the EXIT command to leave the editor and return to MPE. Using the :PRINT command, we can display the contents of our file, and verify that the source we typed really is there. The MYPROG file is permanent, so you can come back to it at a later time.Returning to Your Work
At some later time, you may want to return to your work on MYPROG using the MPE editor. The editor's TEXT command brings the contents of an existing file into the editor's workspace. After logging on and entering the EDITOR command, use the TEXT command to copy the text in MYPROG into your editor workspace. Now you can make changes to it just as we saw earlier. When you're done, you'll want to save your work using the KEEP command, as we saw earlier. If you type the KEEP command with no parameters (as shown in Figure 4), it will reuse the filename you specified in the TEXT command (MYPROG, in this case). It will warn you that it is going to purge (delete) the old MYPROG file and replace it with a new one. If you want to keep the existing version of MYPROG around, you can save your work under a different name by simply typing the KEEP command with a different filename. Suppose you have TEXTed a file into the EDITOR and accidentally made some erroneous changes to it. For example, imagine you accidentally typed "delete 1/100" when you really meant to type "delete 1". As long as you do not type the KEEP command, the original file is still untouched--so you can recover the lines you accidentally deleted. If you enter the EXIT command to leave the EDITOR, it will warn you that your changes have not been saved. (In this case, that's good!) Then get back into editor and TEXT your file back in again.Desktop Editors
Most programmers would rather use the editors and programming tools that are available on their desktops, because they tend to be faster and easier to use. If you have a favorite editor on your desktop computer (PC or UNIX workstation), you can use it to create HP 3000 source code. But before you can compile it, you'll need to copy the file containing your source code to an ASCII file on the HP 3000. This is typically done using industry-standard network services. If your HP 3000 is one of the 32-bit PA-RISC systems, you have a variety of networking options from which to choose:
- The standard file transfer protocol (ftp) has been bundled with MPE/iX since Release 4.0, so it's often the least expensive choice.
- The Network File System (NFS) is a popular option on UNIX systems, and it can be purchased from HP for the HP 3000.
- Microsoft Win95 and NT desktop computers come equipped to use NT-based file servers. Samba/iX is a software package that "disguises" your HP 3000 as an NT-based fileserver.
- Many of the popular PC-based terminal emulators for the HP 3000 (including those available from WRQ and MiniSoft) include file transfer programs that work across a network connection or a serial connection.
Looking Ahead
If your HP 3000 is one of the older 16-bit systems, your networking options are more limited. WRQ's Reflection works with these older systems by utilizing HP's older proprietary network protocols. Once your source code has been copied from your desktop to the 3000, it must be compiled and linked before MPE/iX can execute it. The compiler reads your source code and writes the corresponding binary machine instructions to an object file. The object file, in turn, is input to the linkage editor, which reads the object file and links the object code found there with other object code stored in libraries. (I'll go into more detail on these libraries in a later article in this series.) The linkage editor's output is written to an executable native mode program file. This can be executed using the MPE run command. In the next article in this series, we'll discuss compilers and the linkage editor.
George Stachnik, the director of Hewlett-Packard's Technology Closeup series of television broadcasts, holds the title of chief of customer communications. He works at Hewlett-Packard's campus in Cupertino, California.
![[3khat]](/img/3khat16.ico) 3kRanger
3kRanger