|
Secure Web Console Installation
The installation of the Secure Web Console (SWC) hardware is fairly simple. Proper
configuration of the SWC's IP address plus the complexity
of the network can present problems unless you are properly prepared
before hand. It is therefore highly recommended that you:- Read and ensure you understand
the entire installation and configuration procedure (Hardware
and software) before starting.
- Acquire all required network
information from the system administrator before starting
the installation. (IP addresses, user and administrator names, passwords,
etc.)
Pre-Installation Considerations

The following paragraphs provide an outline of the pre-installation
items you should address before starting a SWC installation. - Obtain an IP address to be assigned
to each SWC.
- Obtain the subnet mask to be assigned to each SWC.
- Obtain the gateway addresses for each SWC. If that
is unavailable use the SWCs IP address.
- Know the name of the system to be administered by
each SWC.
- Have internet access available to access the on-line
installation and configuration procedures, and troubleshooting tools.
- Ensure that your browser is on the Supported Browsers
list
- Configure your Web Browser software options as follows:
 | | For
Microsoft Internet Explorer©:
• Turn
off the JIT Compiler -- (Deselect the [Java
JIT Compiler Enabled] preferences box).
 | Remember to re-enable JIT Compiler after the
SWC is configured. |
|
| | • Disable Proxies (Until final IP address
is assigned) or add the 192.0.0.192 to the proxies list. |
| | For
Netscape Communicator©:
• Disable
Proxies (Until final IP address is assigned) or add the 192.0.0.192
to the proxies list. |
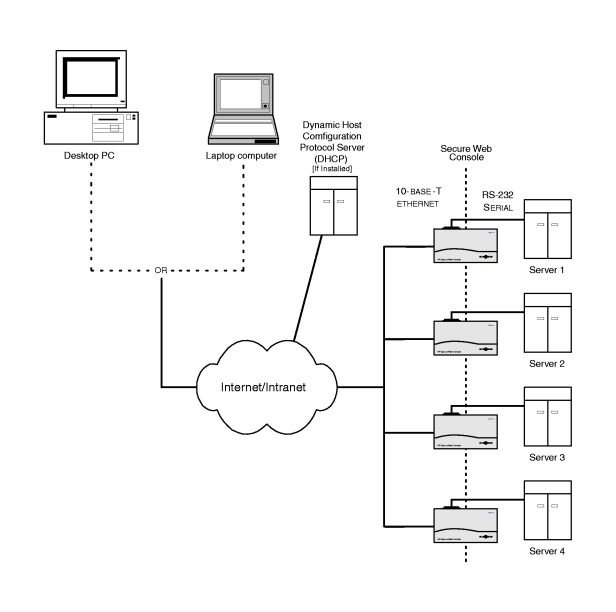
Installing Multiple Secure Web Consoles
All network devices require a unique IP address to operate
correctly.
All SWCs ship from the factory with
the same default IP address 192.0.0.192. If another device on the network is using the same address
(e.g. 192.0.0.192) the results can be unpredictable.
DHCP and the Secure Web Console
DHCP stands for Dynamic Host Configuration Protocol. Every
computer on the internet or intranet has a unique TCP/IP number/address.
Traditionally, TCP/IP numbers are assigned by hand. DHCP is a protocol
that allows the assignment of IP addresses on-the-fly, for
a single session use, from a pool of numbers that the DHCP server
controls. This can cause problems for installing multiple SWCs.
Follow the link at the bottom of this page for more DHCP information.
| Only DHCP on HP-UX is supported. |
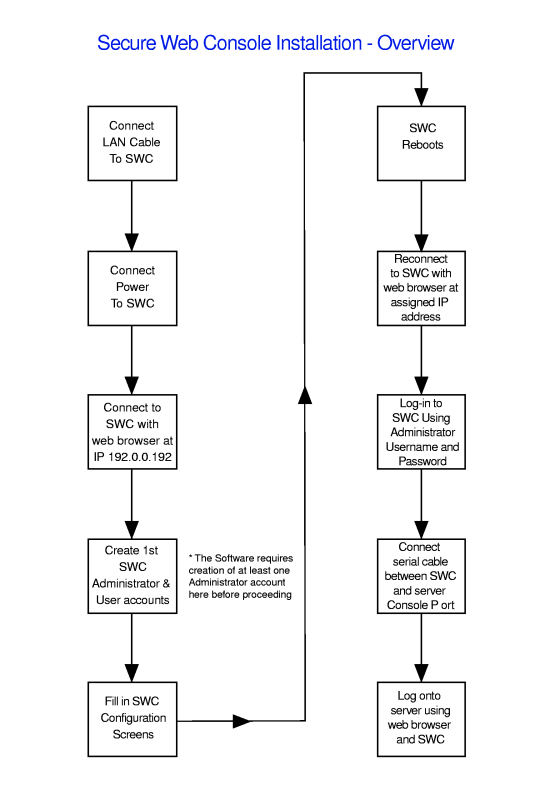
Initial Cable Connections
To make the cable connections between the SWC and the server,
proceed as follows:
| Step 1. | Connect the SWC to the Intranet/internet
(LAN).
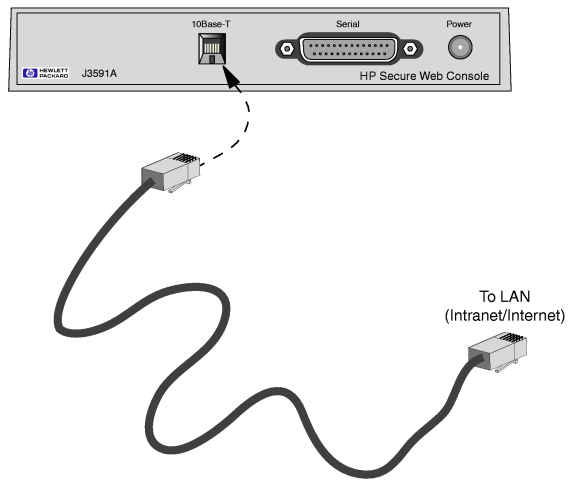 |
| Step 2. | Plug the power module into an appropriate AC power source.
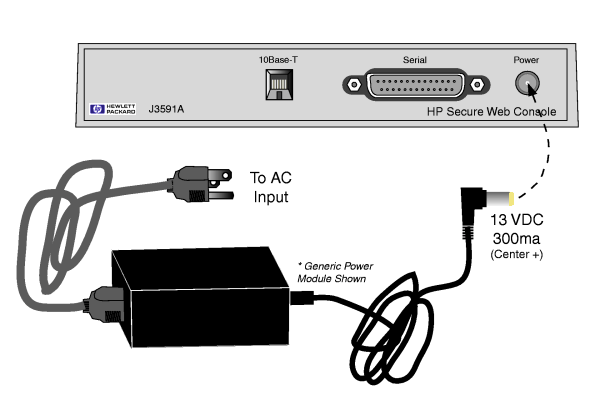 |
| Step 3. | While observing the LEDs on the SWC, connect the power
modules DC output to the Power connector.
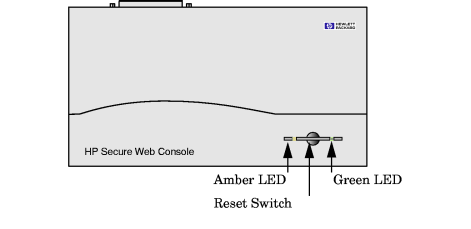
|
LED Indications |
|
Solid Amber
|
Self-Test in progress
|
Amber Off
|
Self-Test completed
|
Amber Stays On
|
Self-Test Failed
|
Flashing Green
|
Network Activity
|
 | For system security, initial configuration
must be completed before making
the serial connection between the SWC and the server's
console port.
Failure to follow this precaution
can result in root level access being available to any level of
SWC user. |
|
| Step 4. | Perform Initial Configuration of the SWC.
| a. | Ensure that no other devices (printers,
etc.) are connected, on the same local
subnet by disconnecting the LAN cable from the SWC and
using the Ping command as follows:
C:\
ping 192.0.0.192
It should time out. |
| b. | At a command line prompt, enter the following:
C:\route add 192.0.0.192 xx.xx.xx.xx.xx
Where
xx.xx.xx.xx.xx is the IP address
of your PC or Unix workstation. |
| c. | .Reconnect the LAN cable to the SWC and use a PC or
Unix Workstation and a web browser, verify that you can access the
SWC at its default IP address using the Ping command
as follows:
C:\ping 192.0.0.192
It should indicate connection with the SWC at IP 192.0.0.192 |
|
| Step 5. | Create first SWC administrator account.
| The SWC requires the creation of the first administrator
account before proceeding further. |
| a. | Using a web browser, access the SWC at the
default IP address (192.0.0.192).
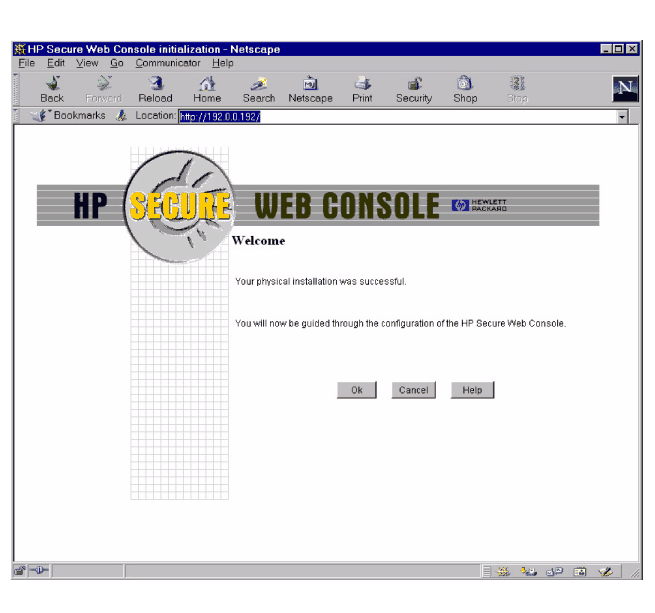 |
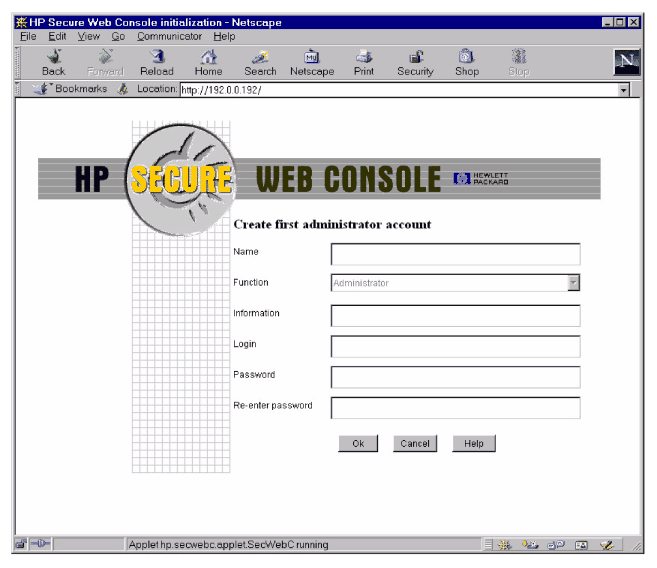
| b. | To create the first SWC administrator account fill in
the prompts shown in the following illustration:
 |
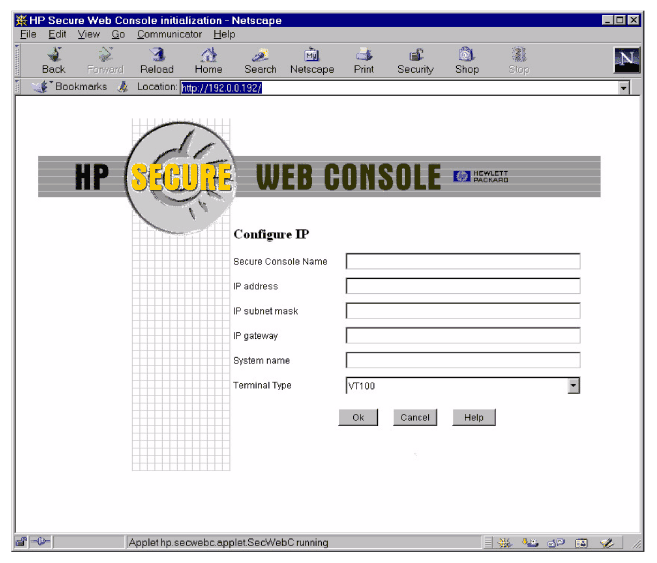
| c. | To configure the network parameters for the SWC fill
in the prompts shown in the following illustration:
 |
| d. | When all necessary data is entered, click on [OK] to
reboot the SWC.
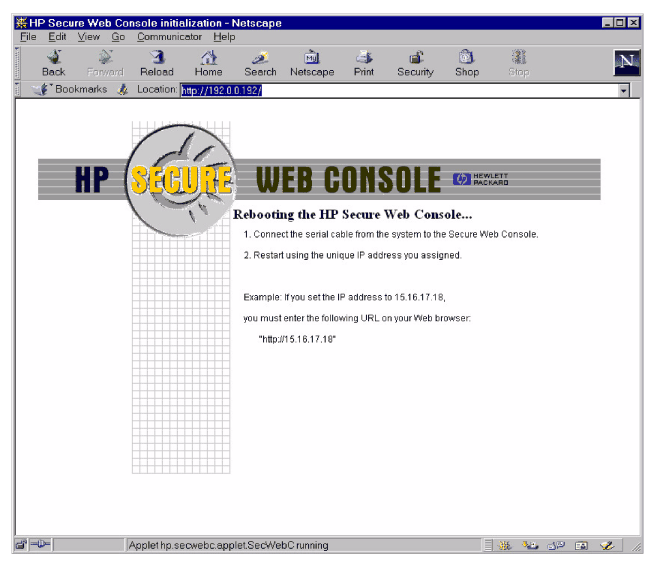 |
|
| Step 6. | Using a web browser, connect to the SWC using: - the newly assigned IP address,
and
- the newly created administrator log-in and password.
| It may take as much as 45 seconds to gain initial access
to the SWC. |
 |
| Step 7. | Connect the serial cable between the SWC and the server's
console port.
 |
| Step 8. | SWC configuration is complete. |
| Step 9. | You may now connect to the server to be administered
by selecting [Access console]. |
| Step 10. | Use [Zoom In] or [Zoom Out] to adjust the size of the
display window. |
| Step 11. | Refer to [Help] or [Guided Tour] menu options to review
SWC features and functions. |
|